Managing multiple projects in Jira can be like assembling a puzzle. Each piece is essential, but without a cohesive overview, the bigger picture gets lost. That’s why we need a board to consolidate all projects into a single view. It streamlines complexity, providing a clear line of sight across various projects, and aligns your team under one strategic vision.
Why consolidate projects onto one board? It’s about efficiency, simplicity, and the harmony of shared efforts. But how exactly do you achieve this seamless integration within Jira’s robust framework? And is there a tool that can enhance this integration even further? Explore TeamBoard ProScheduler – a solution designed to give you and your team a bird’s-eye view of your entire project landscape. In the following sections, we will explore the ins and outs of multi-project management within Jira, and how TeamBoard ProScheduler can be the ace up your sleeve.
Why You Need to Manage Multiple Jira Projects on a Single Board?
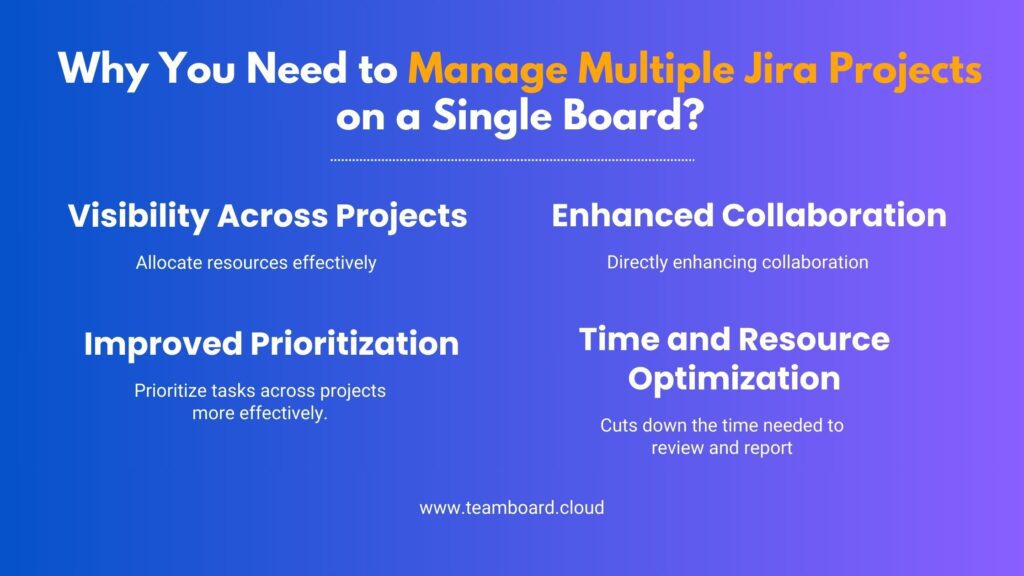
1. Visibility Across Projects
A single board for multiple projects grants you unprecedented visibility. It breaks down silos between projects, allowing stakeholders to monitor progress, identify bottlenecks, and allocate resources effectively without the need to switch contexts or navigate through multiple boards and filters.
2. Enhanced Collaboration
When team members can see how their work aligns with others across different projects, it fosters a sense of unity and purpose. It streamlines communication as everyone can speak the same visual language of progress and priorities, directly enhancing collaboration.
3. Improved Prioritization
With all your projects on one board, you can prioritize tasks across projects more effectively. It allows project managers to quickly shift focus and resources to where they are needed most, ensuring that critical tasks don’t get lost in the shuffle.
4. Time and Resource Optimization
A single view means less time spent on administrative tasks and more on actual management. It cuts down the time needed to review and report on project statuses and helps in identifying where your team’s efforts should be concentrated.
How to manage multiple projects with Jira?
Transforming the way you manage your projects in Jira can be accomplished in a few strategic steps. Here’s how you can bring multiple Jira projects onto a single board, simplifying the complex landscape of tasks, sprints, and backlogs.
Learn details about creating and managing a multi-project Jira board with Jira Guru
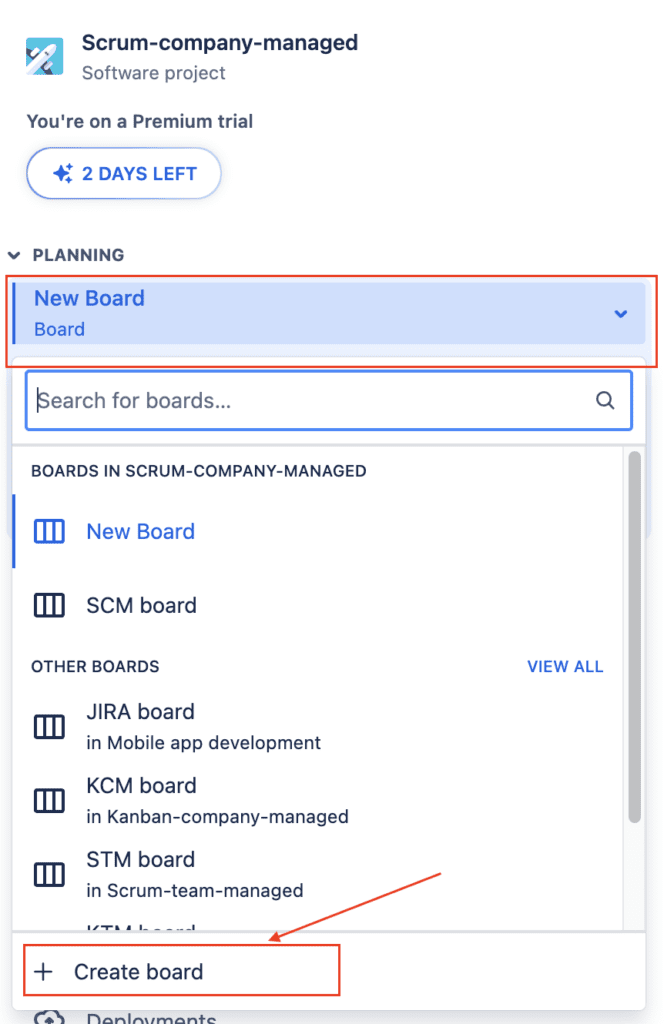
1. Create a New Board
Start by creating a new board in Jira. You can choose between a Scrum board for sprints or a Kanban board for continuous flow. This will serve as your central dashboard for all projects.
2. Configure Board Filters
To combine multiple projects, you’ll need to set up board filters. Jira allows you to create a filter using JQL (Jira Query Language) that encompasses issues from multiple projects. For example, a filter-like project in (PROJ1, PROJ2, PROJ3) will pull in issues from projects PROJ1, PROJ2, and PROJ3.
3. Map Statuses and Columns
Ensure that the workflow statuses of the different projects align with the columns of your new board. You might need to tweak workflow schemes to match your board columns so that each issue type moves smoothly through the workflow.
4. Customize Swimlanes
Swimlanes are a great way to categorize issues on your board and can be used to separate different projects, teams, or priorities. For instance, you could have a swimlane for each project, making it easy to view their respective tasks.
5. Set Up Quick Filters
Quick filters offer a dynamic way to further manage your view. You can create filters for each project, various issue types, or priorities to quickly switch between views on the same board.
6. Define Board Permissions
Permissions are crucial when multiple projects are involved. Define who has access to this board, ensuring the right team members can view and modify the tasks.
Manage Multiple Jira Projects on a Single Board with TeamBoard ProScheduler
What is TeamBoard ProScheduler?
TeamBoard ProScheduler is a Jira Plugin available on the Atlassian Marketplace, developed by DevSamurai, a Platinum Marketplace Partner of Atlassian. It is designed for managers who face the challenge of overseeing multiple projects within the Jira platform.
This tool specially for project and portfolio management, provides both Timeline and Gantt view, which allow set dependencies with auto-scheduling, establish baselines, convert tasks to milestones, and more. Besides, with TeamBoard ProScheduler you can also manage resource capacity, plan tasks by drag-and-drop, set recurring tasks, plan a task multiple times and multiple assignees, and manage team workload.
How to Manage Multiple Projects with TeamBoard ProScheduler
When your project management needs to outgrow the standard capabilities of Jira, third-party tools like TeamBoard ProScheduler step in to elevate your experience. Managing multiple Jira projects on a single board becomes not just possible, but proficiently powerful with ProScheduler. Here’s how it redefines the game:
1. Seamless Integration and Setup
TeamBoard ProScheduler integrates smoothly with Jira, allowing you to merge multiple projects onto one platform effortlessly. It syncs with your existing Jira projects, so you can set up your unified board with a few clicks. There’s no need for extensive configurations – ProScheduler is designed to be intuitive and user-friendly.
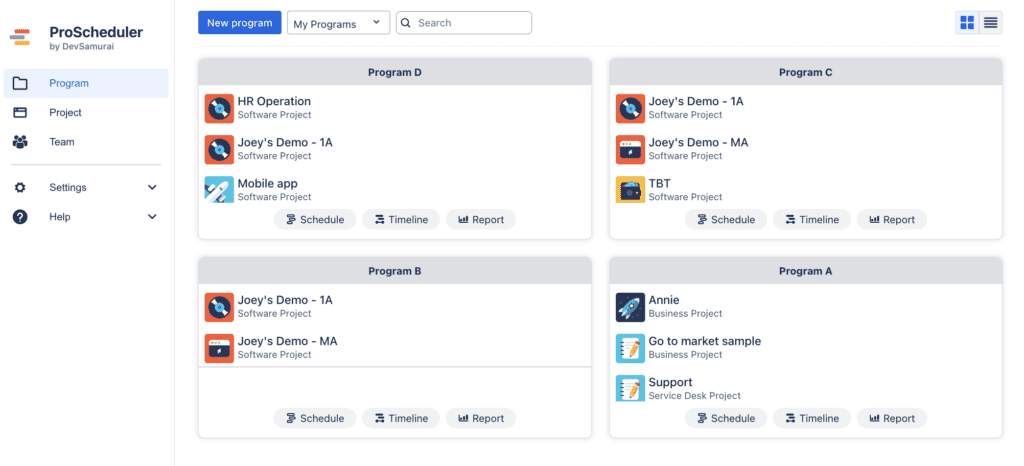
After installing the TeamBoard ProScheduler App, you can start creating programs that include multiple projects.
2. Resource Planning and advanced Scheduling Features
With ProScheduler, you gain access to sophisticated scheduling options that go beyond Jira’s native capabilities, enabling you to plan and reschedule tasks across multiple projects with ease and precision.
- Drag-and-drop functionality
- Set recurring tasks easily
- Assign a task to multiple members without duplicate ticket
- Plan a task multiple times
- Workload management and adjustment across projects

3. Timeline for Seamless Workflow Coordination
See all your projects laid out on a single, interactive timeline with a Jira Hierarchy structure. This bird’s-eye view helps you understand how different projects interact and overlap. Use the timeline to set dependencies along with auto-scheduling functionality, and mark significant milestones and deadlines across projects, ensuring that critical dates are communicated and visible to all stakeholders.

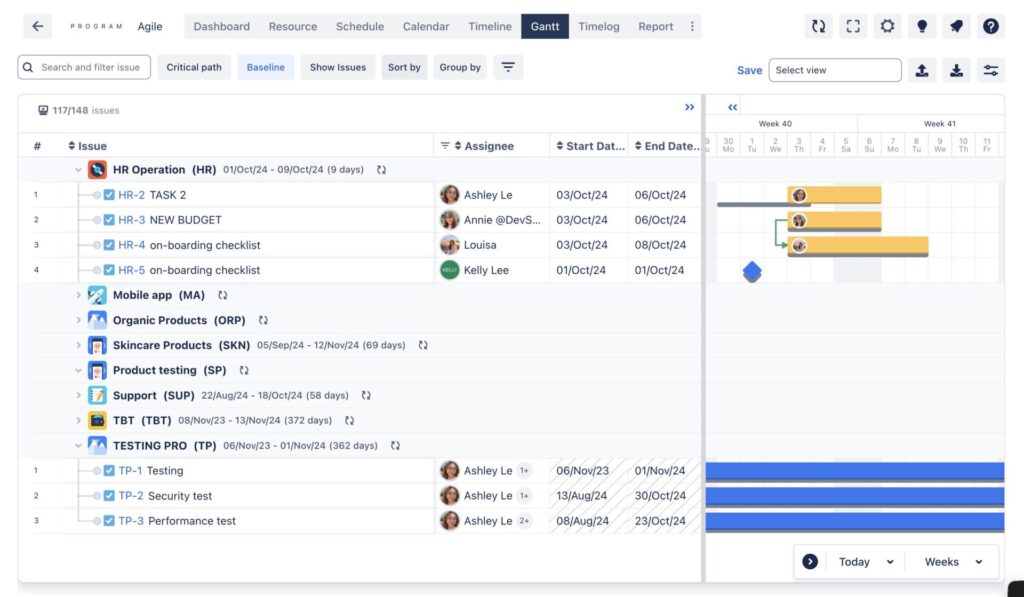
4. Gantt Chart for Complex Project Mapping
ProScheduler’s Gantt Chart feature offers a visual timeline for all your project tasks, providing a clear long-term view of your project schedules across multiple Jira projects. Easily set up a baseline, identify critical paths, convert tasks to milestones, and view dependencies between tasks from different projects, ensuring that the impact of schedule changes is visible and manageable. Specifically in the Gantt chart, you can flexibly drag and drop task to change Jira Hierarchies.
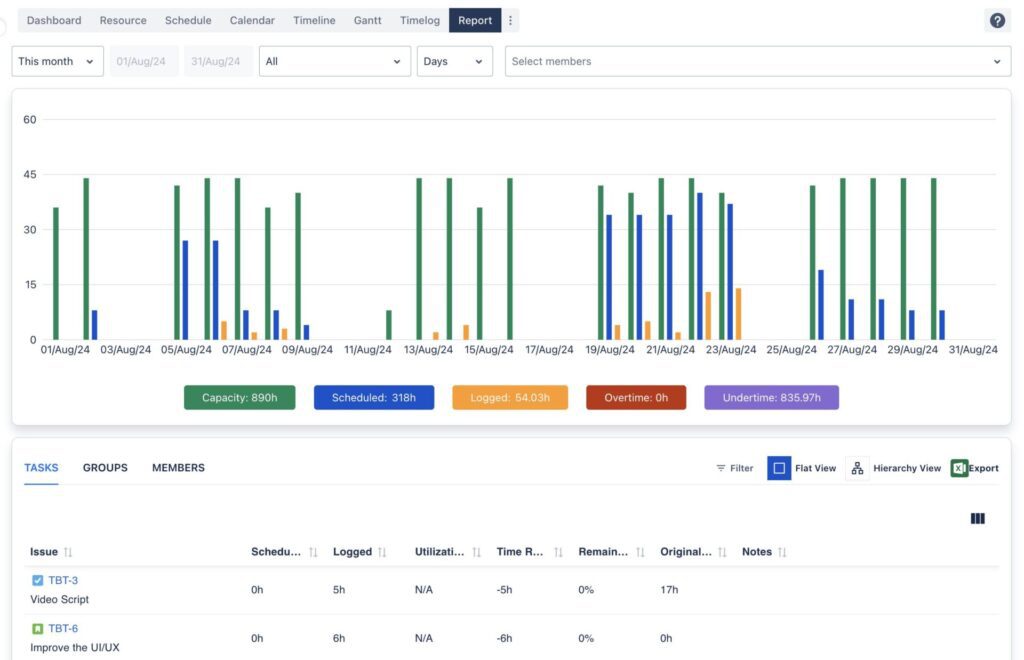
5. Reporting and Analytics
ProScheduler enhances your reporting power with in-depth analytics and custom reporting features. Generate comprehensive reports on multiple projects at once, providing valuable insights into project performance and progress.
How to Start Learning about TeamBoard ProScheduler?
Embarking on the path to mastering TeamBoard ProScheduler is an excellent step toward enhancing your project management capabilities within Jira. Here’s how you can begin your learning journey:
1. Start with a Free Trial
Sign up for the 30-day free trial offered by TeamBoard ProScheduler. This no-cost opportunity allows you to explore the features and benefits firsthand, giving you a solid understanding of how the tool can fit into your workflow.
Should you need more time, reach out to us to inquire about an extension. Email: hello@teamboard.cloud
2. Dive into User Guides and Demo Videos
Take advantage of the user guides provided. These documents are designed to walk you through each feature, offering step-by-step instructions and valuable insights.
Watch the demo videos available. Visual learning can be incredibly effective, and these videos often showcase common use cases that you can emulate.
3. Get in Touch for Personalized Support
Don’t hesitate to contact the support team if you have any questions or run into issues. Personalized support can help clarify complex points and guide you through specific scenarios.
Utilize the contact options available, whether it be through email, a support ticket system, or a dedicated helpdesk.
4. Schedule a Live Demo
For a comprehensive understanding, schedule a live demo with the TeamBoard ProScheduler experts. You can receive real-time answers to your questions and see a demonstration of the tool’s capabilities tailored to your project management needs through a demo.
During the demo, engage with the team, ask questions specific to your use cases, and learn best practices for leveraging TeamBoard ProScheduler to its fullest potential.
By following these steps, you can systematically uncover the power of TeamBoard ProScheduler. The hands-on experience gained from the trial period, supplemented with the detailed resources and support from the DevSamurai team, will put you on a fast track to becoming an adept user, ready to harness the full suite of features to manage multiple Jira projects effectively.