In the dynamic realm of project management, maintaining a comprehensive grasp of project costs is indispensable. Cost tracking for Jira emerges as a powerful ally, furnishing teams with the necessary tools to adeptly navigate budget constraints. This ultimate guide is your pathway to mastering cost tracking within Jira in 2024, offering a treasure trove of practical guides, invaluable tips, and lucid explanations aimed at refining this pivotal aspect of project management.
Understanding Cost Tracking for Jira
1. What is cost tracking for Jira?
Cost tracking for Jira refers to the process of monitoring and managing project costs within the Jira platform. It allows project managers and teams to keep a close eye on the financial aspects of their projects, ensuring that they stay within budget and meet financial goals. It involves capturing and analyzing various cost-related data, such as labor costs, materials costs, and other project expenses.
2. The essentials of cost tracking for Jira
At its core, cost tracking in Jira revolves around the allocation and analysis of project costs — from direct costs like manpower, software licenses, and equipment to indirect overheads. But in regulated industries or firms subject to compliance oversight, cost tracking can also be extended to support AML risk management by linking compliance-related costs (for example, compliance software, due-diligence efforts, or audit-related resources) to individual tasks or projects. A robust cost-tracking system then enables managers to:
- Assign specific costs to individual tasks and milestones
- Monitor ongoing expenses against the budget
- Forecast future expenditures based on current trends
- Generate detailed reports for stakeholders
How to Set Up Cost Tracking in Jira?
1. Cost tracking in Jira using custom fields:
This approach requires you to create custom fields for cost-related data and then configure your Jira project to utilize these fields effectively. Here’s a step-by-step guide on how to do this:
Step 1: Structure your budget tracking in Jira
The initial phase involves delineating the cost components critical to your project. This might include various dimensions such as:
- Cost Type (e.g., labor, materials, overhead)
- Estimated Cost
- Actual Cost
- Variance
Step 2: Create custom fields in Jira
Once you have identified the components to track, the next step is to create custom fields in Jira for each of these elements. Here’s how you can do it:
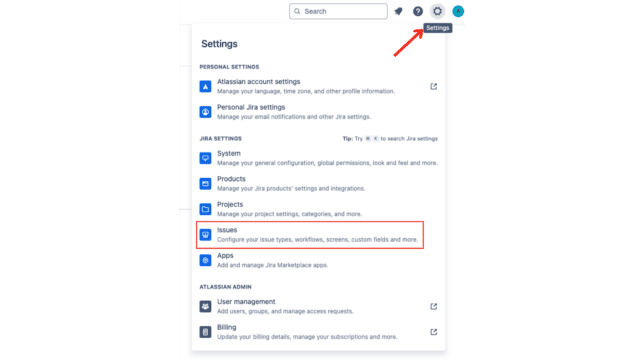
1. Go to Jira settings: Navigate to Jira Administration. You’ll need admin rights to access these settings.
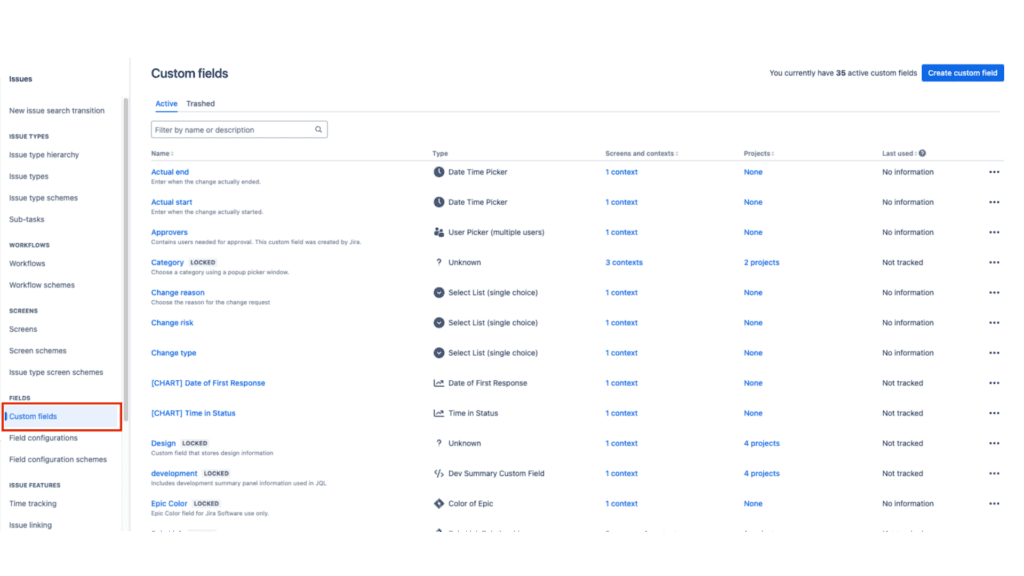
2. Find the Fields settings: Look for the “Issues” section and select “Custom fields.”
3. Create a new custom field: Click the “Create custom field” button.
4. Then choose the appropriate field type for your data (e.g., Number Field for costs, Text Field for cost types).
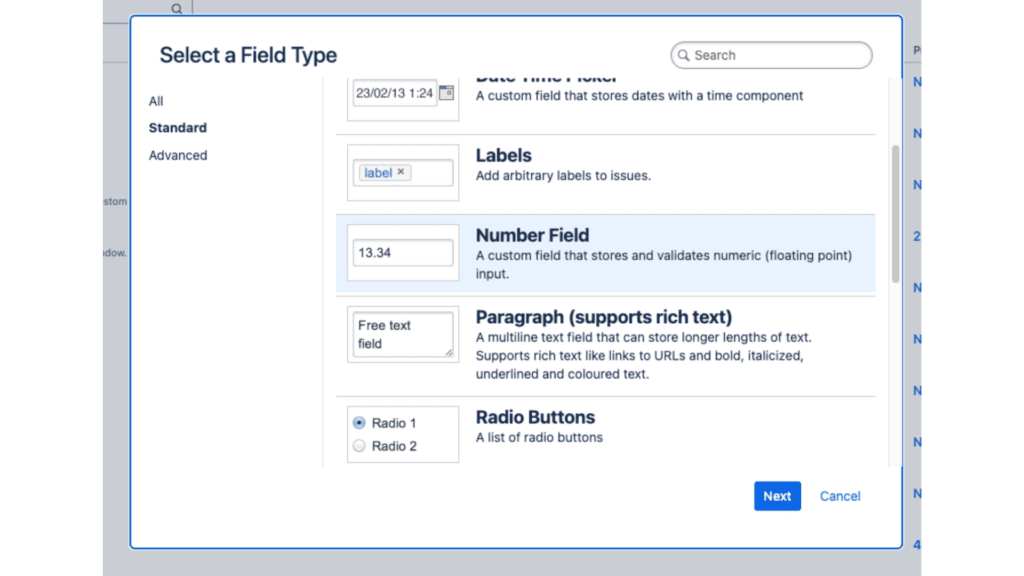
5. Configure the field: Name your field (e.g., “Project Budget”) and set any additional options required for your tracking needs.

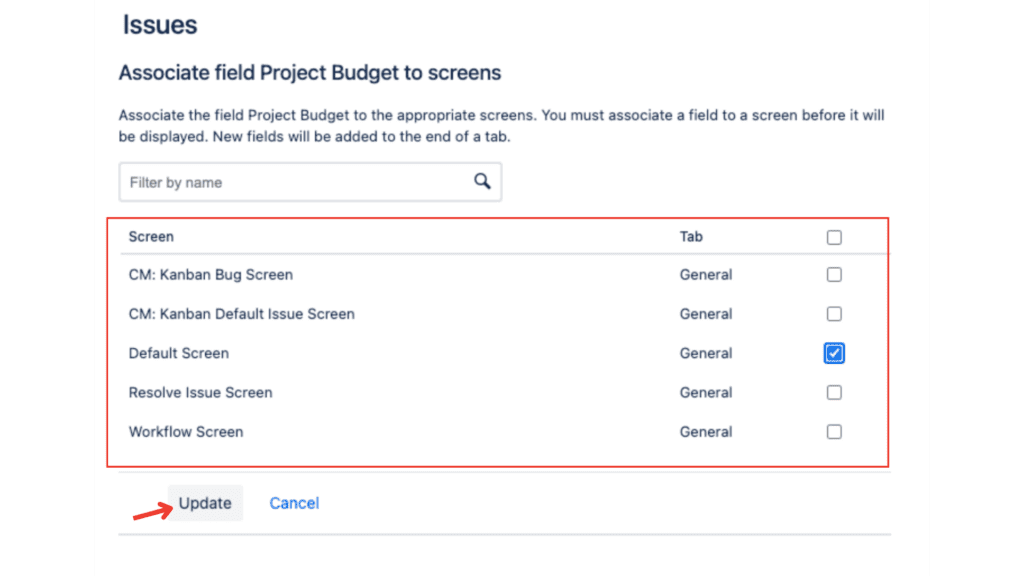
6. Add the field to screens: Ensure your new custom fields are added to the relevant project screens so they can be filled out when creating or editing issues. Then click “update” to finish
Step 3: Utilize the fields in your projects
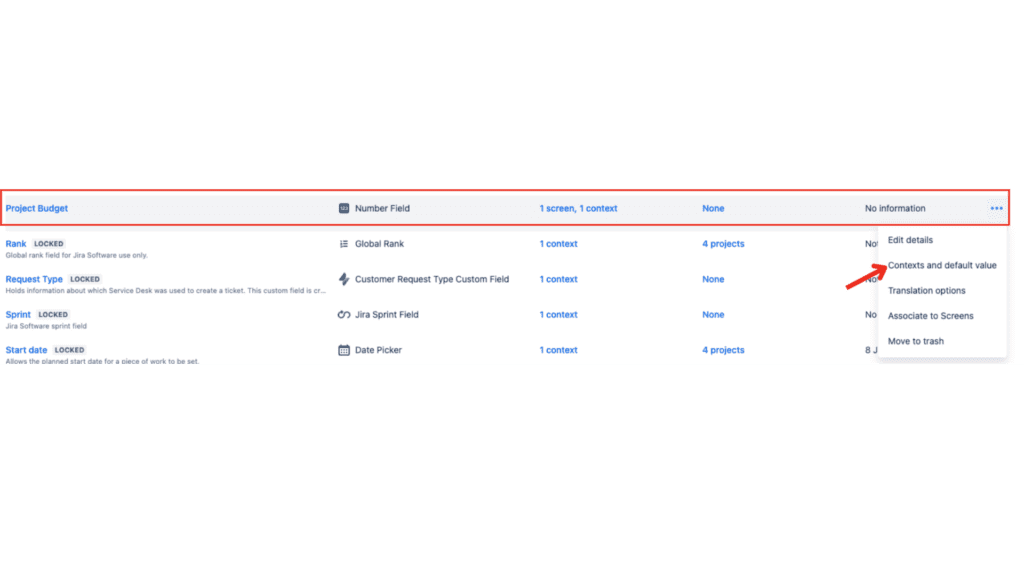
Once the fields are created and added to your screens, you can start using them in your projects. Then go back to the “Custom Fields” page, find your “project budget” click “…” and choose “contexts and default value”
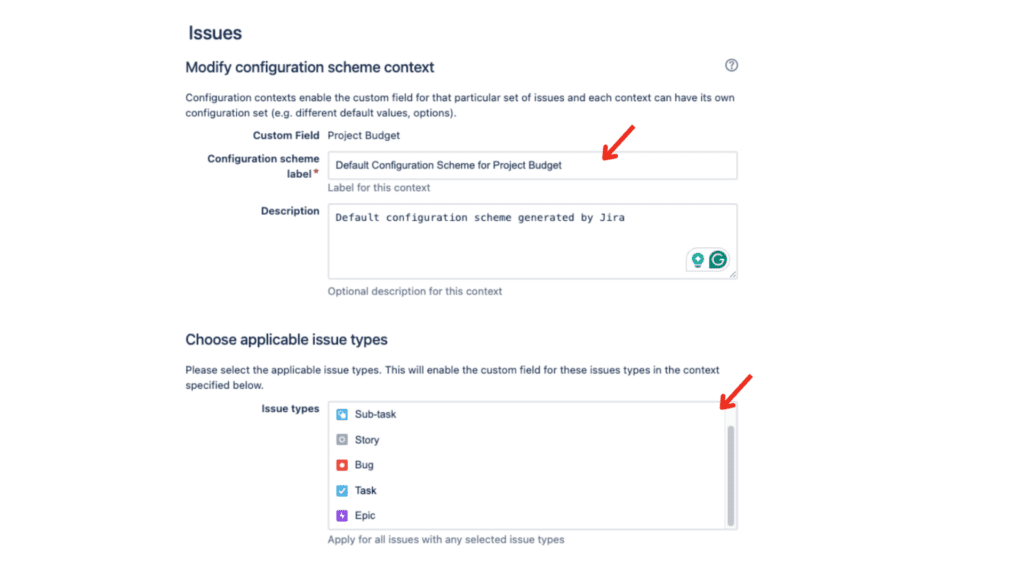
Here, you can add or edit contexts to specify which projects or issue types the field should be available for.
- Input Costs: When creating or updating issues, input the relevant cost information into the custom fields.
- Monitor Costs: Use Jira’s search and reporting tools to monitor and report on cost data. You can filter issues by your custom fields or use dashboard gadgets to display cost information.
Step 4: Automate and integrate (optional)
For enhanced cost tracking, consider automation for calculations or integration with financial software. Jira’s automation rules and marketplace addons or API integrations can significantly aid in this process.
Step 5: Review and adjust
Continuously review your cost-tracking setup to ensure it aligns with your project management needs, making adjustments to custom fields and processes as required.
Limitations of tracking costs in Jira using custom fields
While integrating project budget tracking into Jira using custom fields is a strategic approach that brings several benefits, there are also some potential disadvantages to consider:
- Complexity and Setup Overhead: Configuring custom fields can be complex and time-consuming, especially for organizations with unique requirements.
- Manual Data Entry and Error Risks: Relying on custom fields often means manual data entry, which is prone to errors and inconsistencies.
- Limited Financial Reports: Lacks advanced financial reports to ensure accuracy in cost allocation.
- Scalability Issues: As organizations grow, their financial tracking needs become more complex. The manual and somewhat rudimentary nature of cost tracking through custom fields in Jira can become cumbersome and inefficient.
Cost Tracking Plugins and Add-ons for Jira
In addition to its built-in cost-tracking capabilities, Jira offers a range of plugins and add-ons that can enhance and extend its cost-tracking functionalities. These plugins provide additional features and integrations that can streamline and automate various aspects of cost tracking in Jira.
For those seeking an all-encompassing cost-tracking solution, integrating Jira with TeamBoard TimePlanner can be a game-changer. This powerful tool not only simplifies cost planning and tracking but also enhances resource allocation and project timeline management, all while integrating effortlessly with Jira.
For a detailed exploration of how TeamBoard TimePlanner optimizes financial management in Jira, including step-by-step tutorials, refer to this comprehensive guide.
Conclusion:
Cost tracking is a critical aspect of project management, and Jira provides a robust platform for effectively tracking and managing project costs. By understanding the essentials of cost management in Jira and leveraging its features and functionalities, you can gain valuable insights into project costs and make informed decisions to ensure project success.
Whether you use Jira’s built-in cost-tracking capabilities or incorporate plugins and add-ons, the key is to establish a solid foundation for budget management and regularly monitor and update cost data. By doing so, you can stay on top of project costs, optimize resource allocation, and ultimately drive project success.