Most teams are good at creating Jira work items. Fewer are good at turning those work items into an actual plan — one with clear timelines, assigned owners, dependencies, and a realistic sense of when things will get done. If your project lives in a backlog and your schedule lives in a spreadsheet, something is always out of sync.
The problem: A backlog is not a plan
Jira is great for tracking work, but it was not built for project planning. Teams running complex delivery in vanilla Jira consistently hit the same walls: no native Gantt chart to visualize timelines and dependencies in one place, no capacity awareness to tell you whether the person assigned to a task actually has time to do it, and no automatic adjustment when one task slips and pushes everything downstream.
On top of that, the plan usually lives in a separate spreadsheet that falls out of sync with Jira the moment work begins. The result is a team executing in Jira and a project manager reporting from a document that no longer reflects reality — two sources of truth that drift further apart with every sprint.
The solution: Bring the plan into the same place as the work
The most effective way to close the gap between a Jira backlog and a real project plan is to add a planning layer directly on top of Jira — one that reads your existing work items, lets you structure and schedule them visually, and stays in sync as work progresses. That means no duplicate data entry, no exporting to spreadsheets, and no reconciling two systems at the end of each week. The team continues working in Jira as they always have, while project managers get the timeline, dependency, and resource views they need to plan and report with confidence.
TeamBoard ProScheduler does exactly this. It sits on top of your Jira data, writes changes back automatically — dates adjusted on the Gantt update the Jira work item, status changes in Jira reflect on the timeline — and keeps both views aligned without any manual effort.
Step-by-step guide
Step 1: Install ProScheduler, Open Your Board, and Set Up Resources
Install TeamBoard ProScheduler from the Atlassian Marketplace.
-
For a single project, open it in Jira and access ProScheduler from the project sidebar.
-
For multiple projects, go to the ProScheduler main page, open the Programs tab, click New Program, and add the relevant Jira projects to get a unified board across all of them.
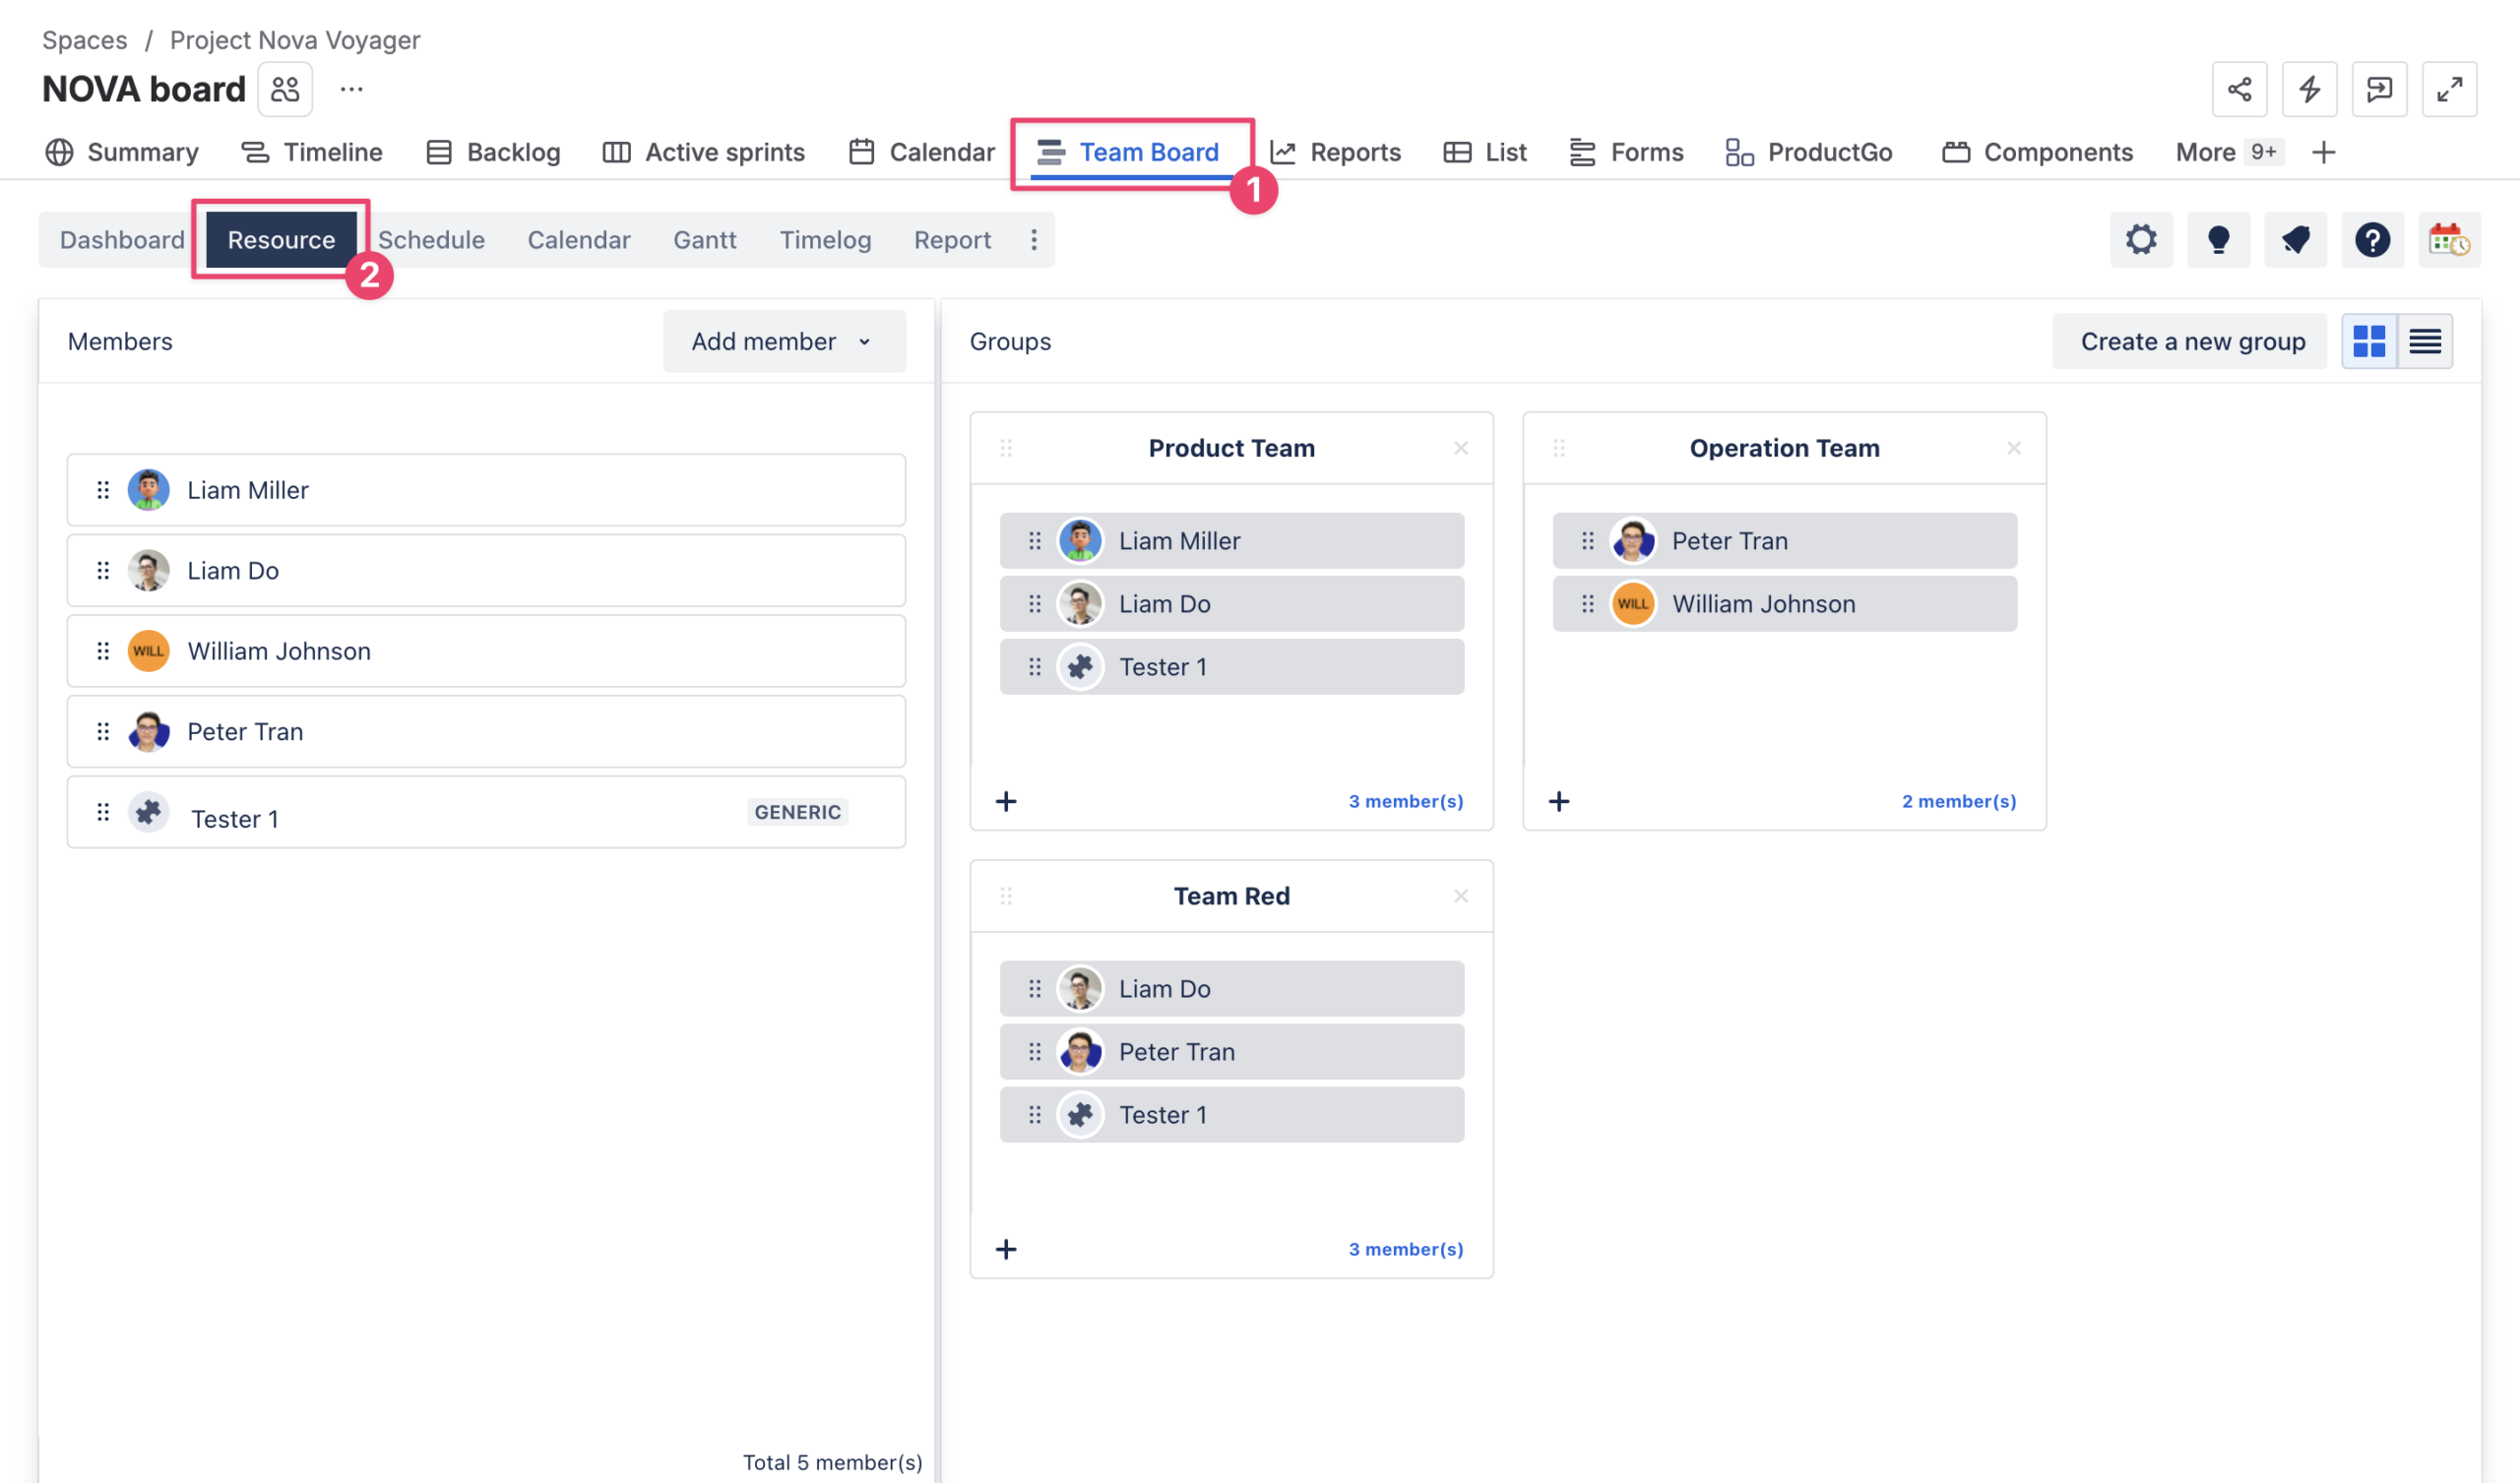
Once the board is open, head to the Resource tab and add your team members — set each person’s working hours, capacity, and time-off. This foundation is what makes capacity checking accurate in every step that follows.
Step 2: Switch to the Gantt Tab and Organize Tasks Using WBS
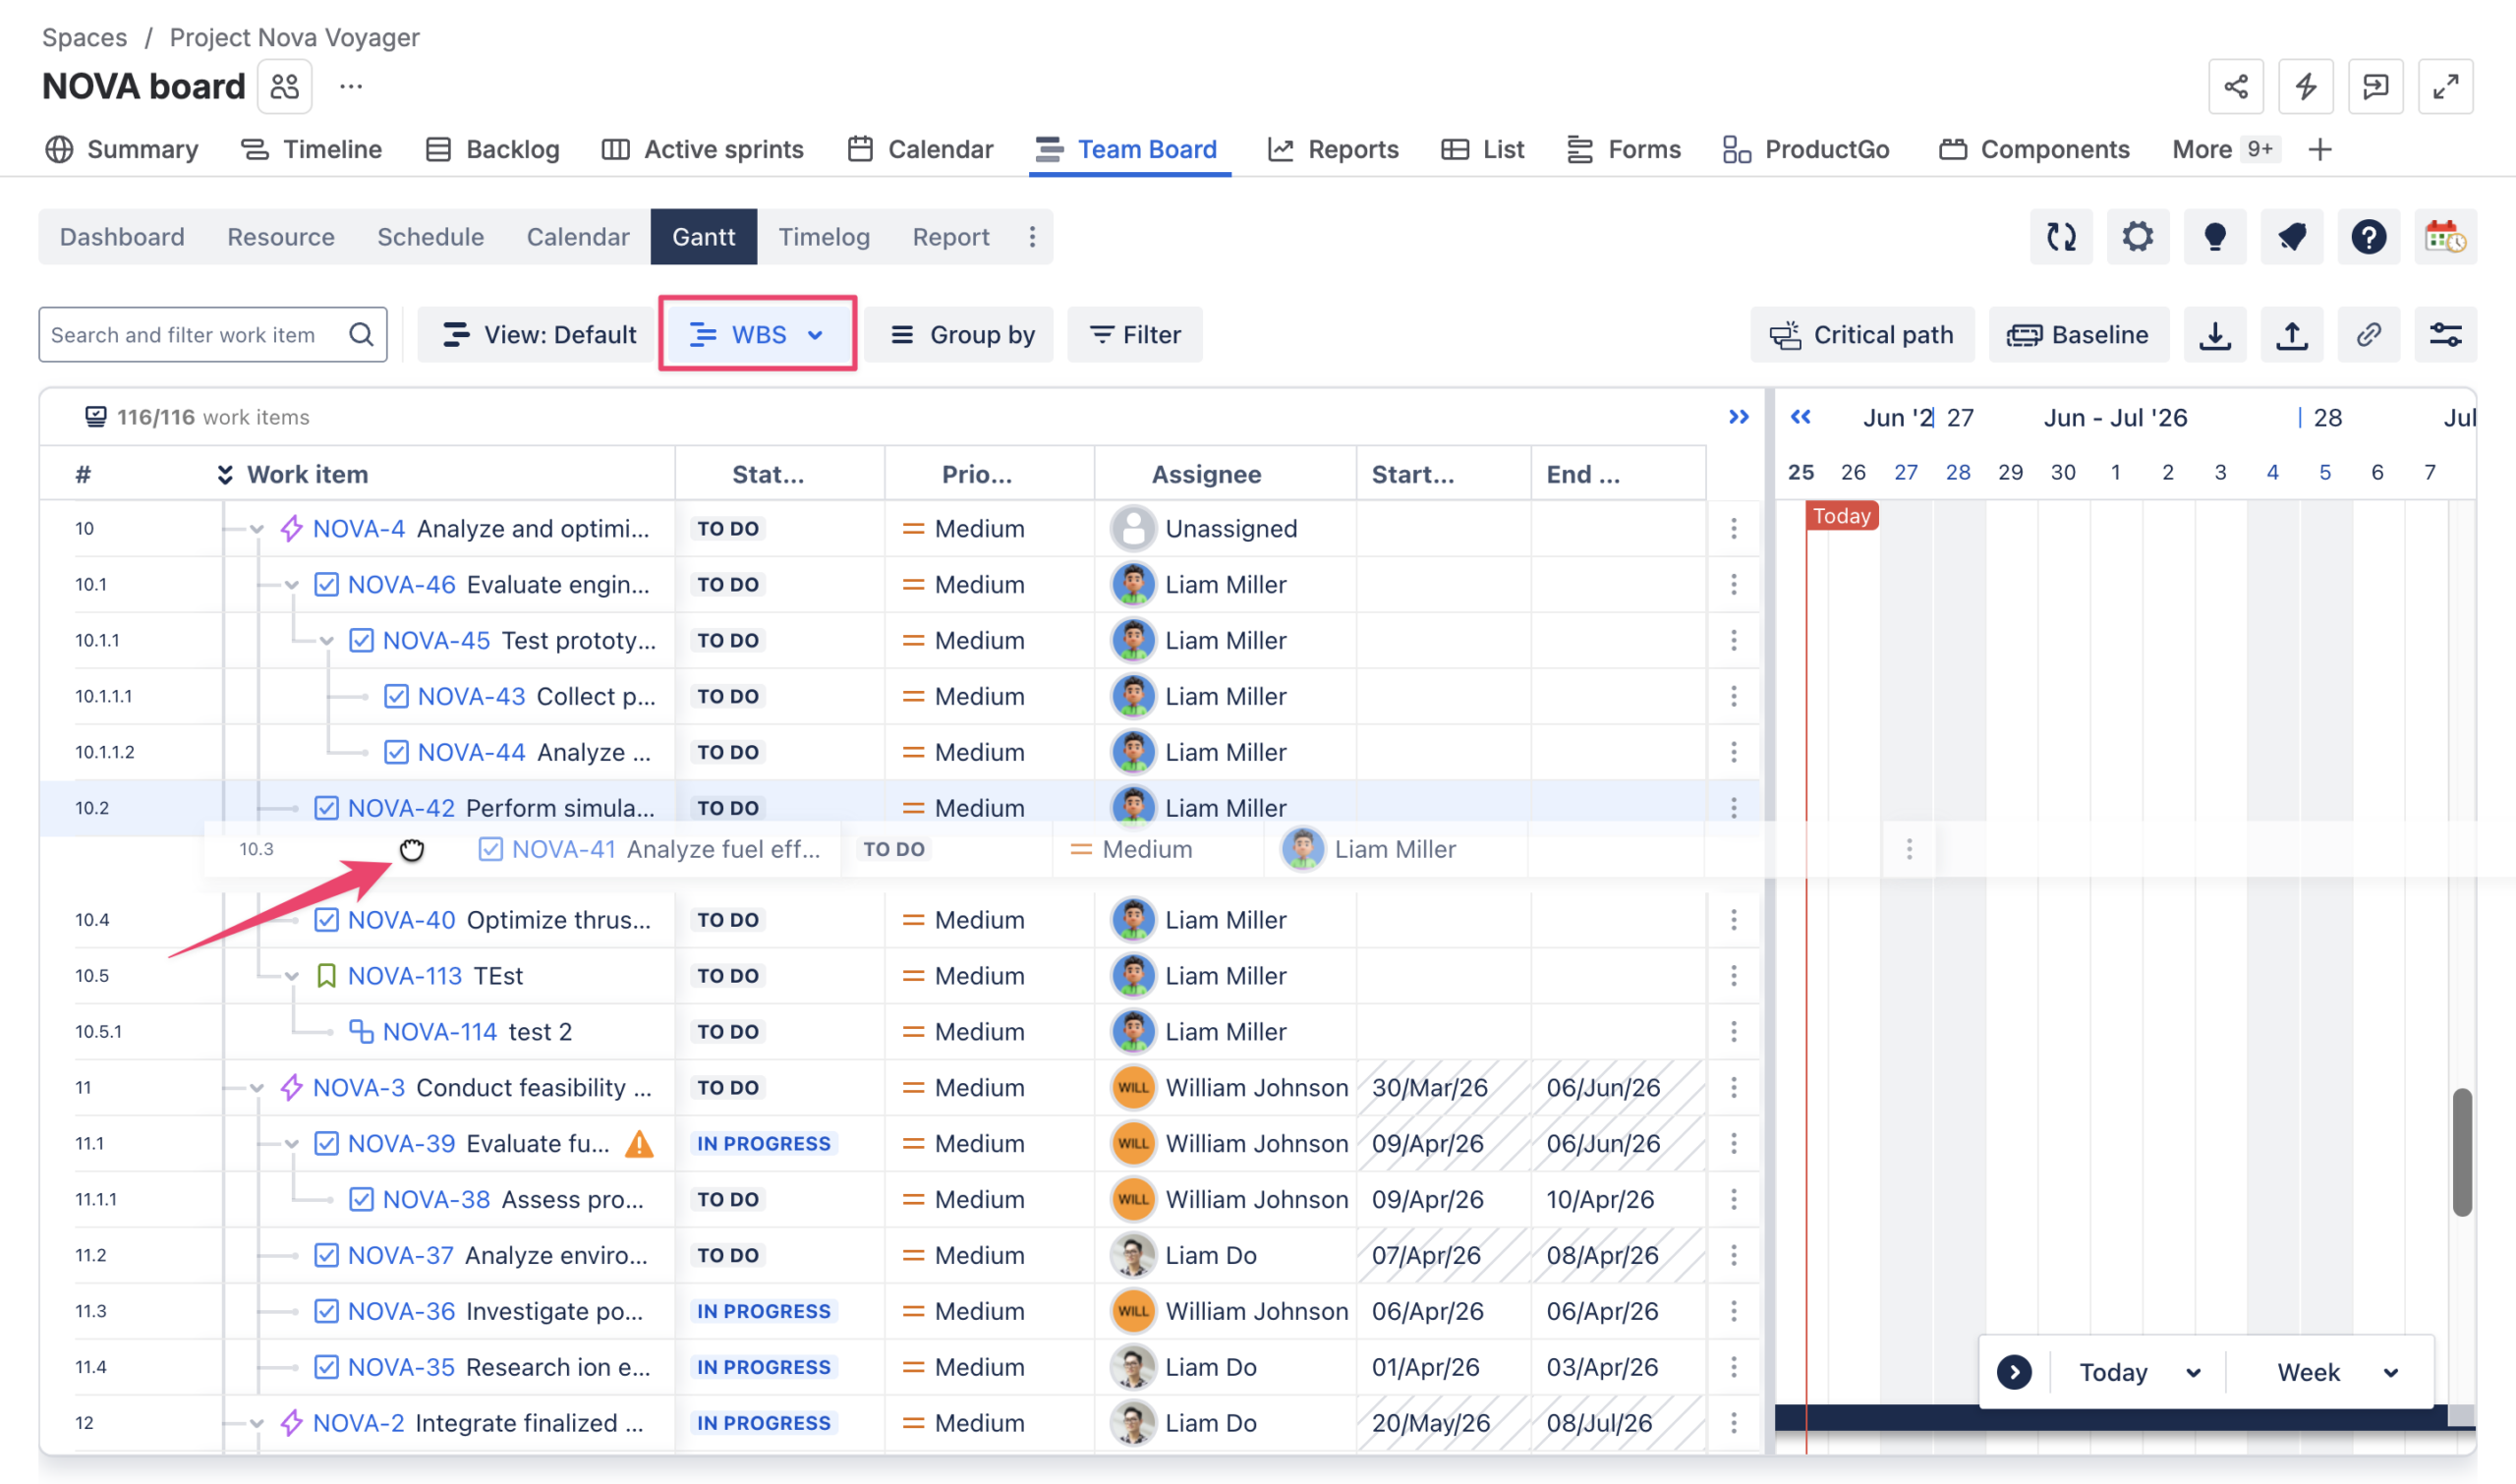
Open the Gantt tab and your Jira work items will appear automatically in their native hierarchy — epics, stories, and subtasks already structured, no import needed.
Before setting any dates, take time to organize this into a logical project structure. Switch to WBS in hierarchy view settings. Drag and drop tasks to reorder or reparent them, group related work under phases or workstreams, and add any missing tasks directly in ProScheduler.
Getting the structure right here makes everything downstream — scheduling, dependencies, and reporting — significantly cleaner.
For Program Boards: the Gantt shows all projects in a single unified hierarchy, and cross-project dependencies can be set here — useful when one team’s output gates another team’s start.
Step 3: Set Task Dates and Dependencies
With the structure in place, start scheduling.
Drag task bars on the Gantt to set start and end dates, or enter them directly in the work item detail panel. Then link tasks to define their sequence — ProScheduler creates finish-to-start dependencies that, with auto-scheduling enabled, cascade automatically when any date shifts upstream. Mark significant delivery points as milestones for stakeholder visibility, and use the critical path to see which tasks directly control the project end date.

If your team logs original estimates in Jira, ProScheduler can use those to distribute hours across each task’s duration automatically, giving you a solid starting point without setting every date by hand.
Step 4: Assign Resources and Check Capacity on the Schedule Board
Switch to the Schedule Board to assign work against real availability.
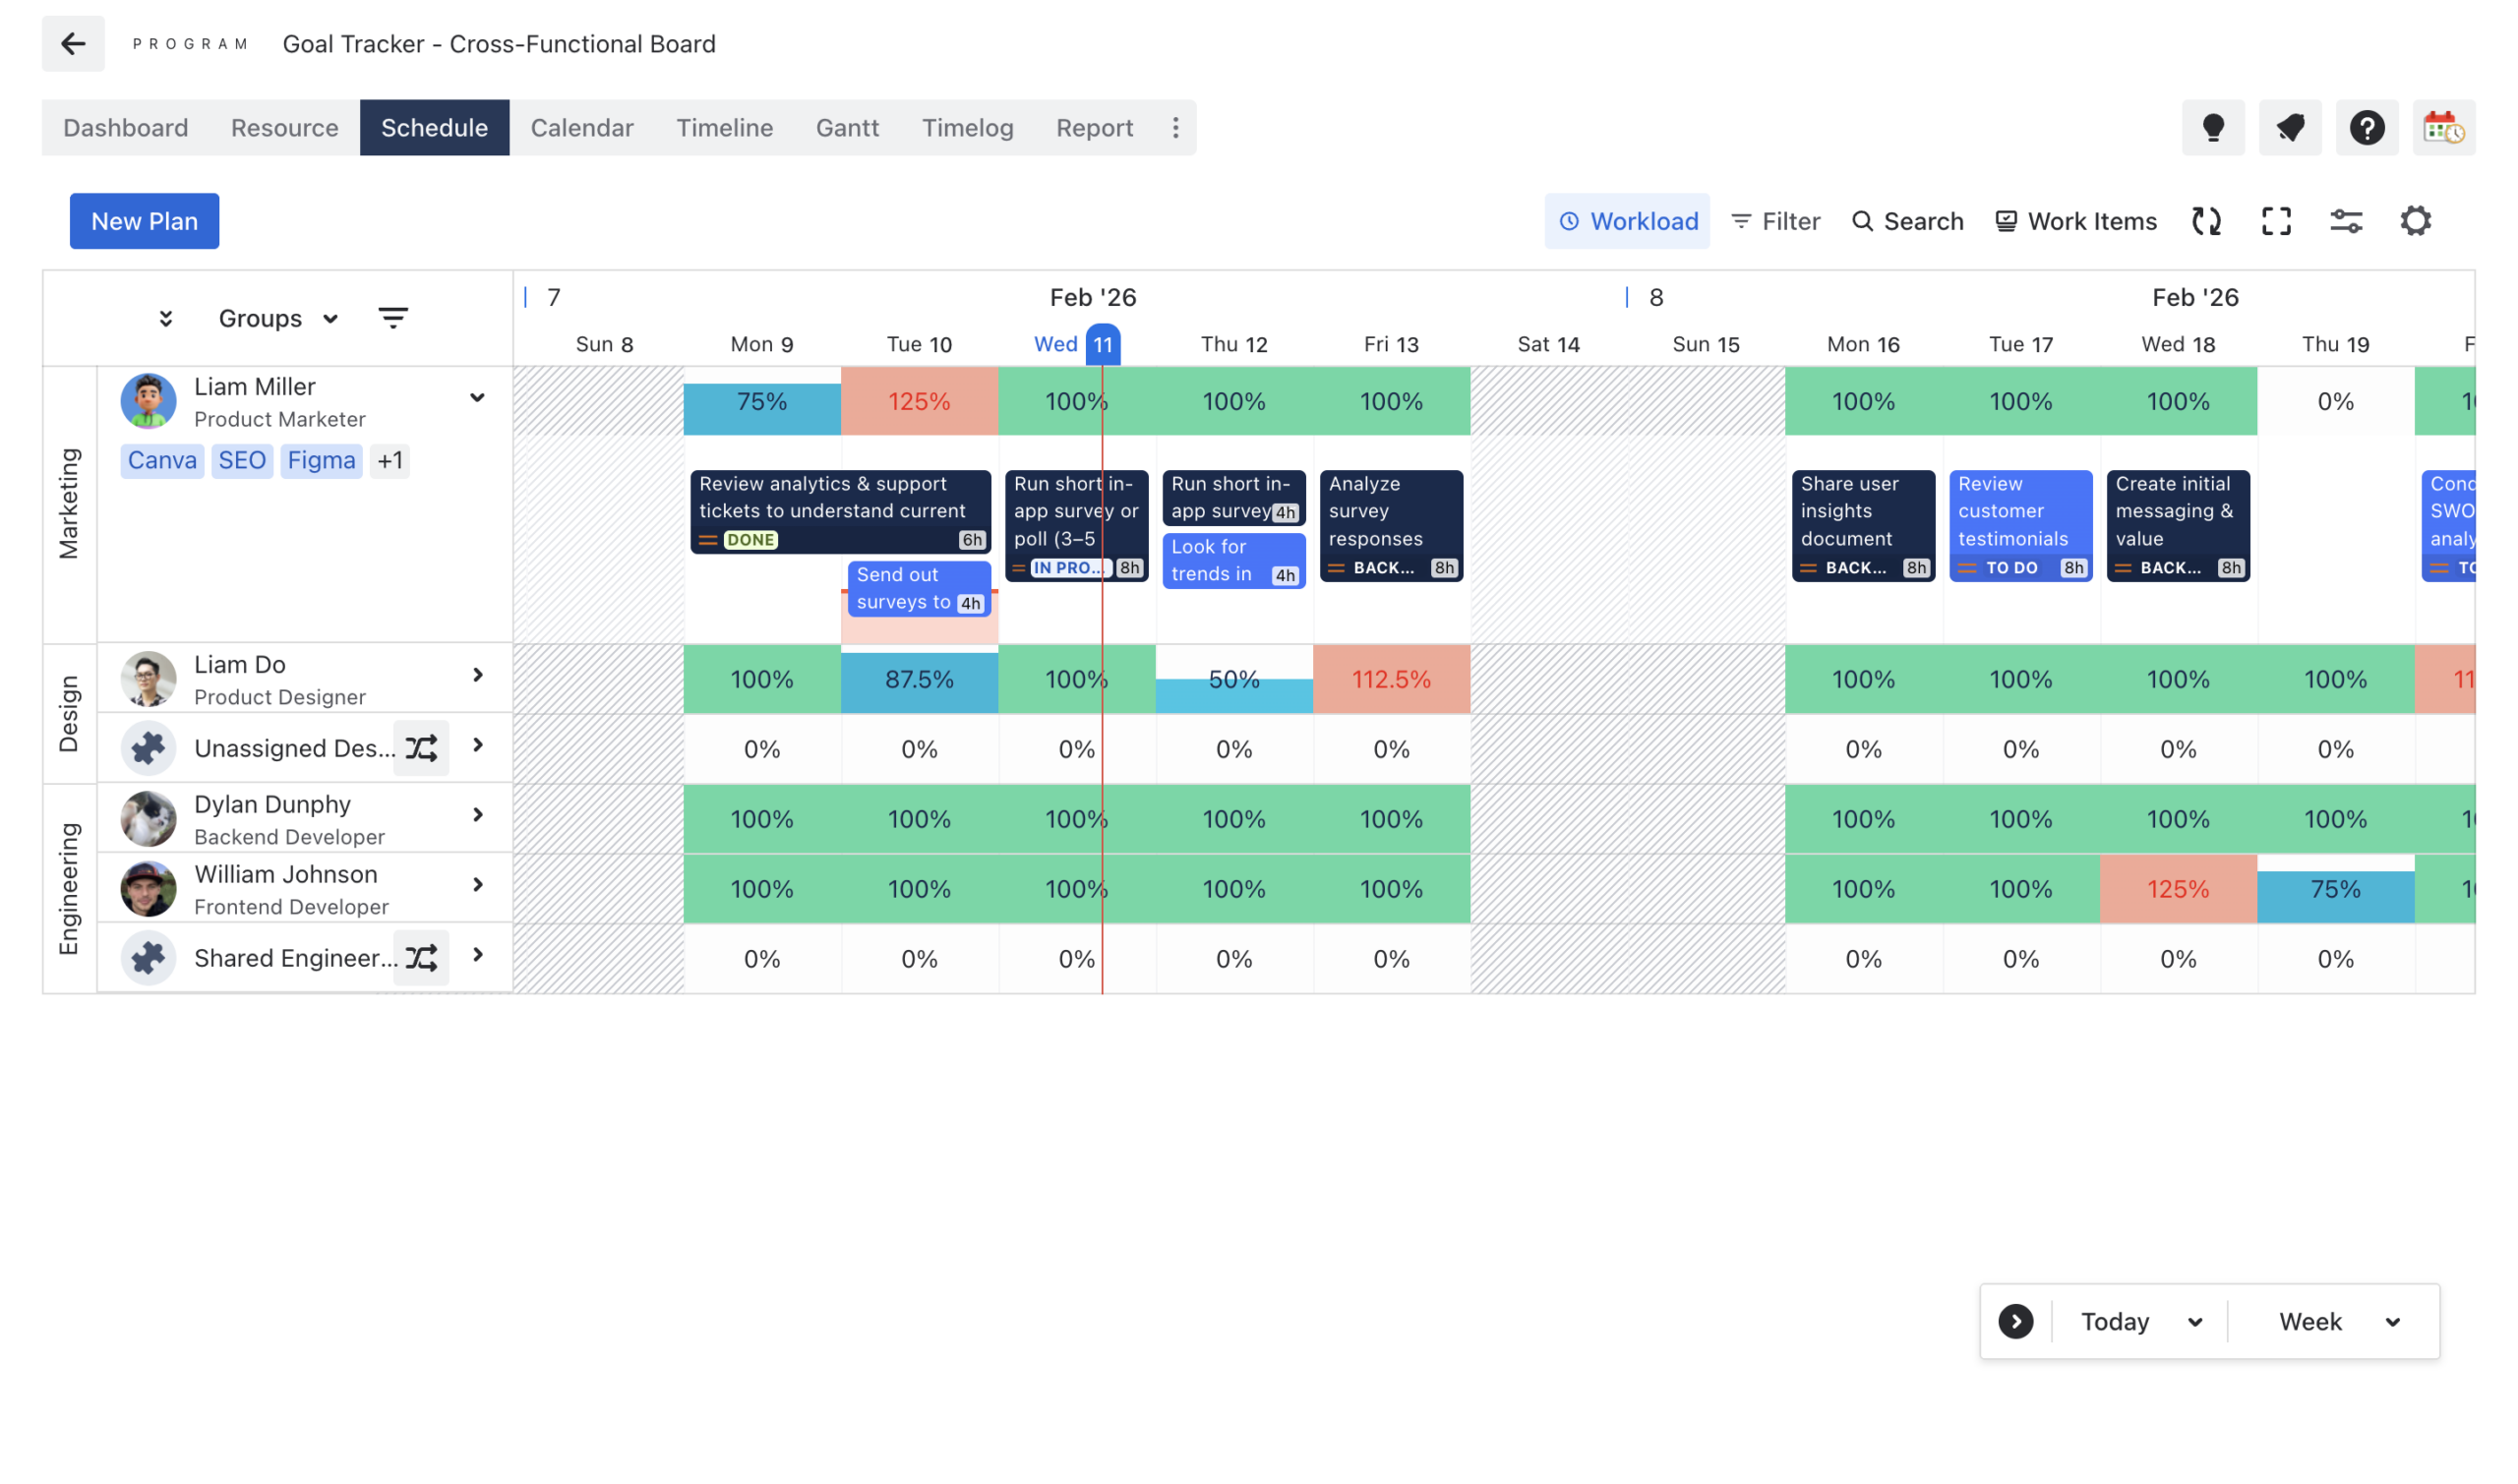
Each team member appears as a row on a timeline — drag work items from the backlog and drop them onto the right person to assign, and resize cards to adjust duration. As you do, the workload heatmap updates live: green means balanced, blue means underutilized, red means over-allocated.
Resolve any red zones before finalizing the schedule by reassigning tasks, extending durations, or shifting dates. A plan that looks right on the Gantt but overloads people will break down in delivery.
Step 5: Set a Baseline to Track Plan vs. Actual Progress
Once the plan is approved, capture a baseline from the Gantt settings.

This records every task’s planned dates at a fixed point — typically at kickoff — so that as dates shift during delivery, you can see exactly where the plan has drifted and by how much. It is what makes status reporting specific rather than vague. Set it before work starts; a baseline captured after things have already moved is no longer a meaningful reference.
Step 6: Sync Progress and Monitor in Real Time
As work gets underway, ProScheduler stays current through two-way sync with Jira — status updates, time logs, and closed tickets all reflect on the Gantt automatically, with no manual input from the project manager.
For progress tracking, you can use time-based tracking (percent complete calculated from logged hours versus estimates) or manual tracking(dragging the progress bar on the Gantt, or updating a 0–100 field on the Jira ticket).
The Report and Dashboard features consolidate task status, resource utilization, and time spent versus planned — giving you the visibility to catch problems before they become missed deadlines.
Best Practices
Following these habits consistently is what keeps the plan accurate and useful throughout delivery — not just at kickoff.
-
Set up resources before touching the Gantt. Without defined working hours and capacity, the workload heatmap has nothing meaningful to calculate against.
-
Structure first, schedule second. Time spent organizing the WBS before setting dates pays back quickly in a cleaner Gantt, clearer dependencies, and more accurate reports.
-
Use dependencies instead of fixed dates to sequence work. Hardcoded dates make the plan brittle — dependency links with auto-scheduling handle the cascade automatically when things shift.
-
Lock the baseline at kickoff, not later. A baseline set after dates have already moved is no longer a record of the original commitment and tells you very little.
-
Treat red on the heatmap as a blocker. Over-allocation means the plan will not work as written — resolve it before finalizing the schedule, not after delivery has already begun.
-
Review the critical path at every project checkpoint. It changes as tasks complete or slip, and checking it regularly keeps focus on the work that actually controls the end date.
-
Use a Program Board from the start if work spans multiple Jira projects. Consolidating into one board early is far simpler than trying to align separate project boards after the fact.
Conclusion
A list of Jira work items becomes a project plan when it has structure, sequence, ownership, and a realistic timeline behind it. TeamBoard ProScheduler provides exactly that — sitting on top of Jira, keeping both views in sync, and giving project managers the Gantt, resource management, and reporting tools that Jira alone does not offer.
Follow the steps above and you move from an unstructured backlog to a living plan that reflects how work is actually progressing, without asking your team to change how they work in Jira. The plan stays honest because it updates as the work does — and that is what makes it useful.