Managing dependencies is essential to project success, but the challenge becomes even greater when those dependencies span multiple projects. Delays in one project can quickly ripple into others, impacting timelines, resources, and overall progress.
While Jira’s linking features enable you to connect issues across projects, they often lack the visibility and control needed to effectively manage these relationships. Without a clear view of how tasks interconnect, project managers often find themselves reacting to problems instead of proactively addressing them.
TeamBoard ProScheduler solves this by turning scattered Jira issues into a unified visual planning board, making it easier to track and manage cross-project dependencies. This ensures your initiatives stay on track and aligned with your broader goals. Let’s explore how ProScheduler helps:
What Are Cross-Project Dependencies?
Cross-project dependencies represent the relationships between tasks in separate projects, where the timing or completion of one task depends on the completion of another task in a different project. For example, a task in the Software Development project might rely on a task from the Product Design project. If the Product Design task is delayed, it could affect the timeline of the Software Development task, creating a ripple effect across projects.
Managing cross-project dependencies is crucial in large initiatives involving multiple teams. Without effective management, delays in one project can cause significant disruptions across all dependent projects, leading to scheduling conflicts, resource mismanagement, and missed deadlines.
How it works
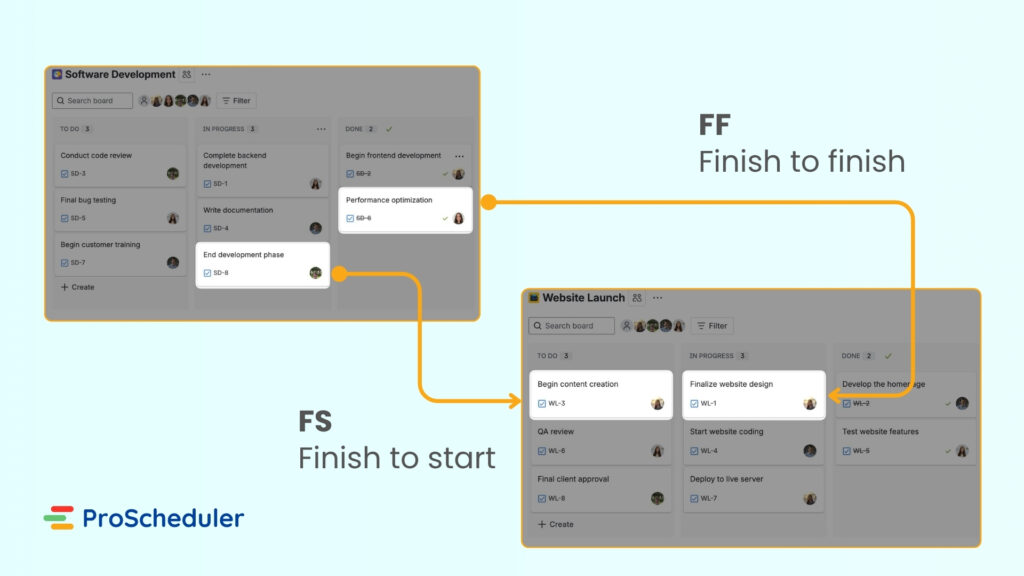
A cross-project dependency creates a connection between tasks in separate projects. For example, a task in the “Software Development” project might depend on a task in the “Product Design” project.
If the Product Design project is delayed, the corresponding task in Software Development cannot start or finish on time, which can disrupt the overall project timeline.
To manage these dependencies, project managers use project management software to link tasks across projects. They typically specify the type of dependency, such as:
-
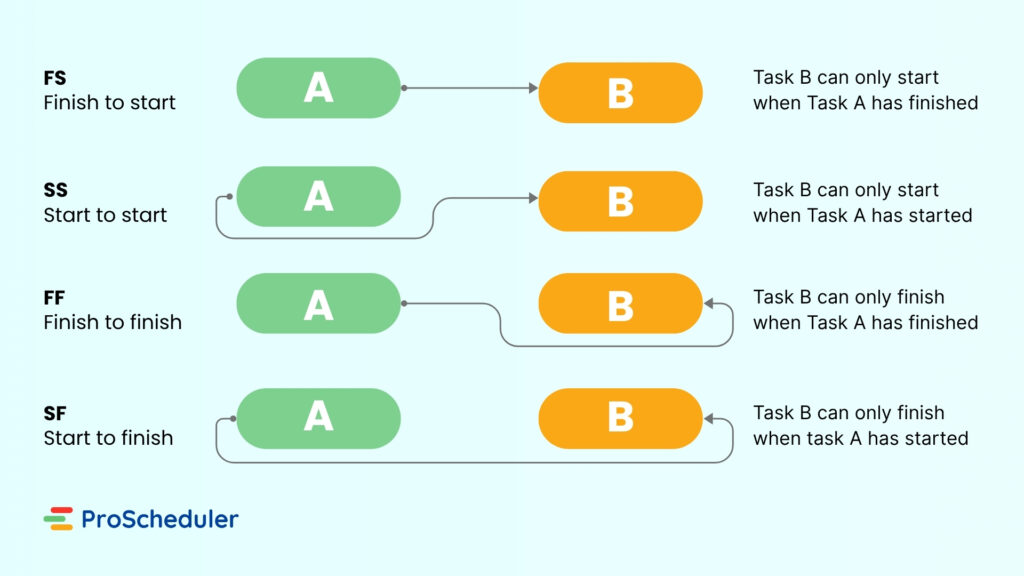
Finish-to-Start (FS): One task must be completed before the next task can start.
-
Start-to-Start (SS): One task must start before the next task can begin.
-
Finish-to-Finish (FF): One task must finish before the next task can finish.
-
Start-to-Finish (SF): One task must start before the next task can finish.
Cross-Project Dependency vs. Inter-Project Dependency
Cross-project dependencies and inter-project dependencies both describe relationships between tasks in different projects, but there’s a key distinction between them:
-
Cross-project dependencies is a broader term that refers to any type of dependency between tasks across different projects. It focuses on the timing or order in which tasks in separate projects need to be completed to ensure smooth workflow.
-
Inter-project dependencies, on the other hand, specifically refer to situations where a task in one project is dependent on a deliverable or output from another project. This could be a completed component, feature, or product, rather than just a schedule or timeline dependency.
How to Create Cross-Project Work Item Links in Jira
What Are Jira Work Item Links?
Jira Work Item Links are used to connect different work items, either within the same project or across multiple projects. These links establish relationships between tasks, indicating that one work item depends on or is related to another. Jira provides several default link types like blocks, relates to, and duplicates:
-
Blocked: blocks / is blocked by – Used to indicate that one work item cannot start or finish until another work item is completed.
-
Relates to – Shows a general relationship between two work items without specifying which one should be completed first.
-
Duplicates: duplicates / is duplicated by – Used to indicate when one work item is a duplicate of another.
These links serve as pointers but do not impose restrictions on work item transitions. Therefore, while they can visually show dependencies, they don’t automatically enforce conditions or restrictions without further customization (like workflows or plugins).
How to Create Cross-Project Work Item Links in Jira
Linking work items across projects in Jira is just as easy as linking within a single project. The only requirement is that you have the necessary permissions to view and interact with work items in the target project.
Follow these simple steps to create a cross-project work item link:
-
Go to the work item you want to link from.
-
Access the Linking Feature:
-
From the Work Item View: Click the “Link work item” button.
-
From a Board: Right-click on the work item and select “Link work item”.
-
-
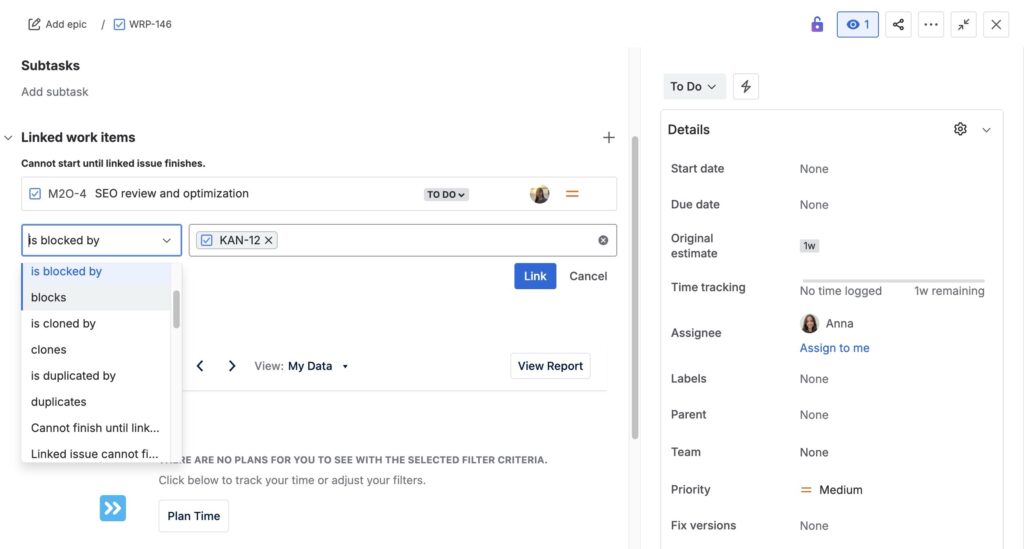
Choose the Link Type: Select a link type, such as:
-
“Relates to”
-
“Blocks” / “Is blocked by”
-
“Duplicates” / “Is duplicated by”
-
-
Search for the Target Work Item:
-
Enter the key or summary of the target work item.
-
Or, create a new work item and link it.
-
-
Click “Link” to complete the connection.
How to Track Cross-Project Work Item Links in Jira
Since plain Jira does not natively visualize Work Item Links on project boards (or anywhere else), you won’t be able to easily view cross-project dependent work items in the default interface. However, there are several ways to track and manage these dependencies:
-
Custom Filters and JQL: Create custom filters using Jira Query Language (JQL) to find work items linked across projects. You can then view these linked tasks in a list format.
-
Third-Party Plugins: Consider using plugins like ProScheduler that allow for more robust visualization of dependencies across projects. These tools can provide a clear view of work item relationships and dependencies across your entire project portfolio.
Managing Jira Cross-Project Dependencies with ProScheduler
ProScheduler enhances Jira’s native functionality by providing a unified visual planning board that integrates Jira work items across multiple projects. This feature streamlines dependency management, saving you time and reducing the risk of delays.
Here’s how ProScheduler helps manage cross-project dependencies:
Step 1: Set Up Your Projects and Programs
-
Create Projects: Before managing dependencies, ensure that all related projects are created in Jira. Whether you’re handling multiple projects within a single department or across different teams, each project should be defined in Jira for proper tracking and management.
-
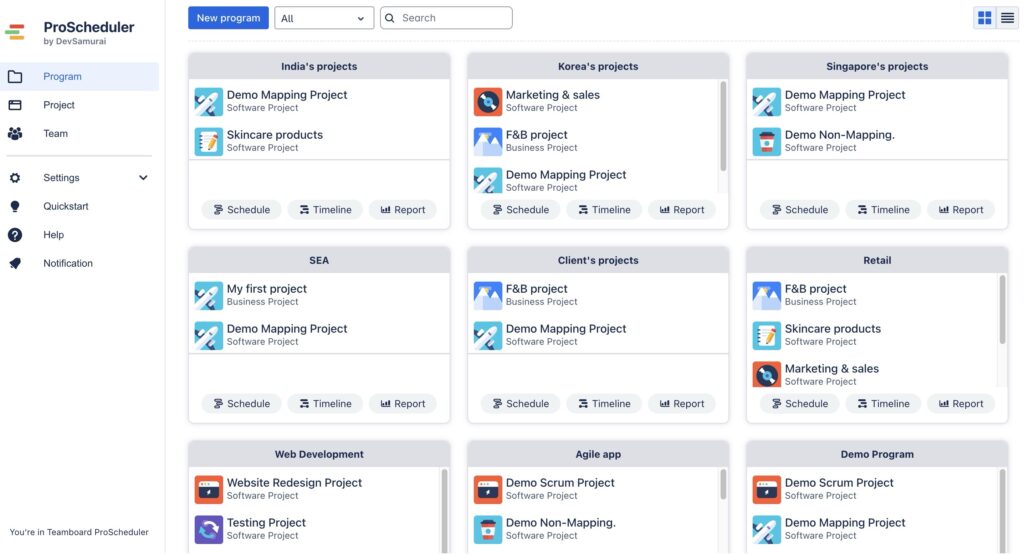
Group into Programs: When working with multiple projects, organizing them into clear categories or “programs” is key to effectively managing dependencies. ProScheduler’s Programs feature allows you to group related projects or portfolios together. This step simplifies the management of interdependent tasks across projects, providing you with a comprehensive view of the entire initiative in a single place.
Step 2: Mapping Jira Work item Links to dependencies ProScheduler
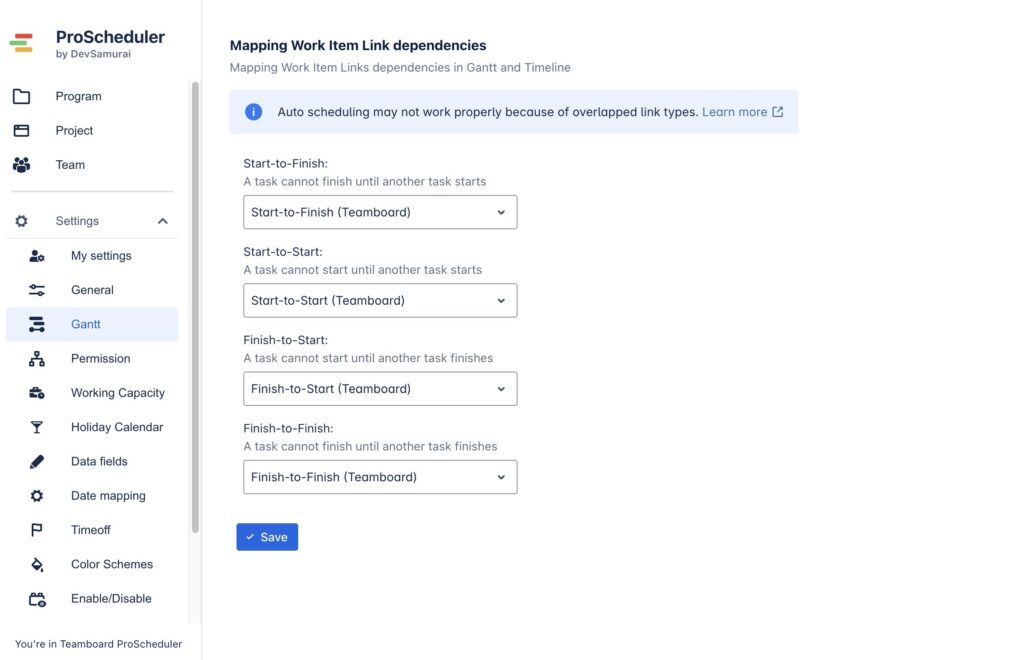
ProScheduler provides a way to map Jira’s default issue link types to four key dependency types: Finish-to-Start (FS), Start-to-Start (SS), Finish-to-Finish (FF), and Start-to-Finish (SF). This ensures that the relationships between tasks across different projects are accurately represented in ProScheduler, allowing project managers to define the proper sequence of task execution.
How to configure:
-
Access Gantt Settings: In ProScheduler, go to App Settings and open the Gantt settings section.
-
Map Jira Link Types: Map Jira’s default issue link types, such as “blocks”, “is blocked by”, and “relates to”, to the appropriate dependency types in ProScheduler.
Step 3: Visualize Work Items
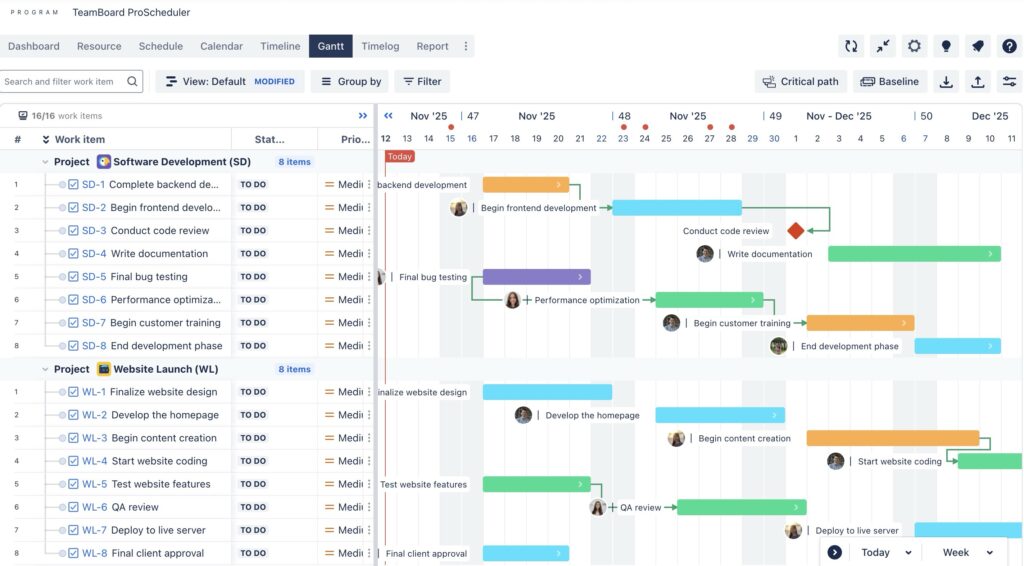
Once your projects are grouped into a program, ProScheduler provides a unified Gantt chart to visualize tasks from multiple projects. This view allows you to see all tasks in one timeline, helping you track how tasks in different projects are interrelated.
-
Access the Gantt Chart in Program: Navigate to the Gantt chart view within your program in ProScheduler. This view allows you to visualize all your work items from multiple projects in a unified timeline.
-
Plan Tasks on the Timeline: In this view, you can easily add tasks to the timeline, giving you a clear visual representation of your cross-project dependencies.
Step 4: Create Dependencies Cross-Project
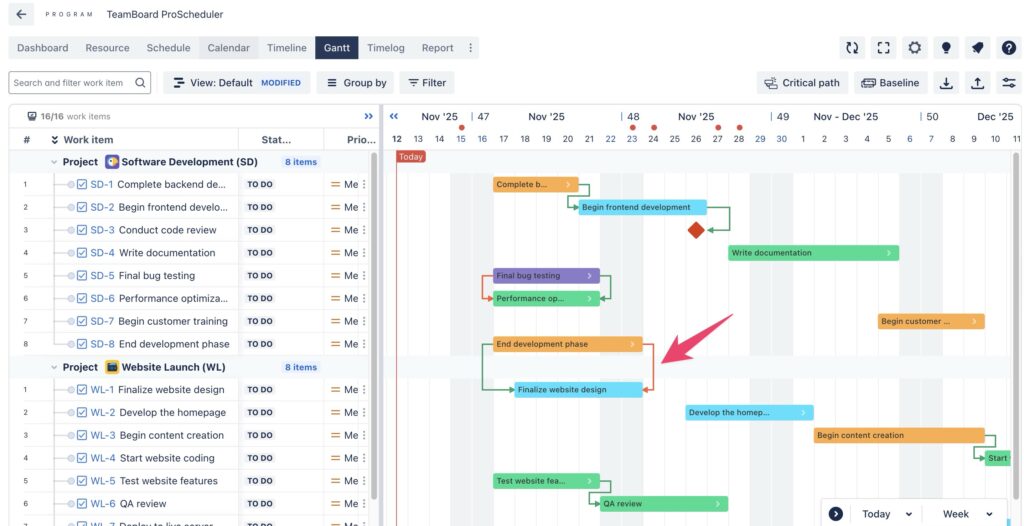
When you group multiple projects into a Program, all tasks from those projects are displayed together in a single Gantt chart. This allows you to easily visualize and manage how tasks in separate projects are interdependent.
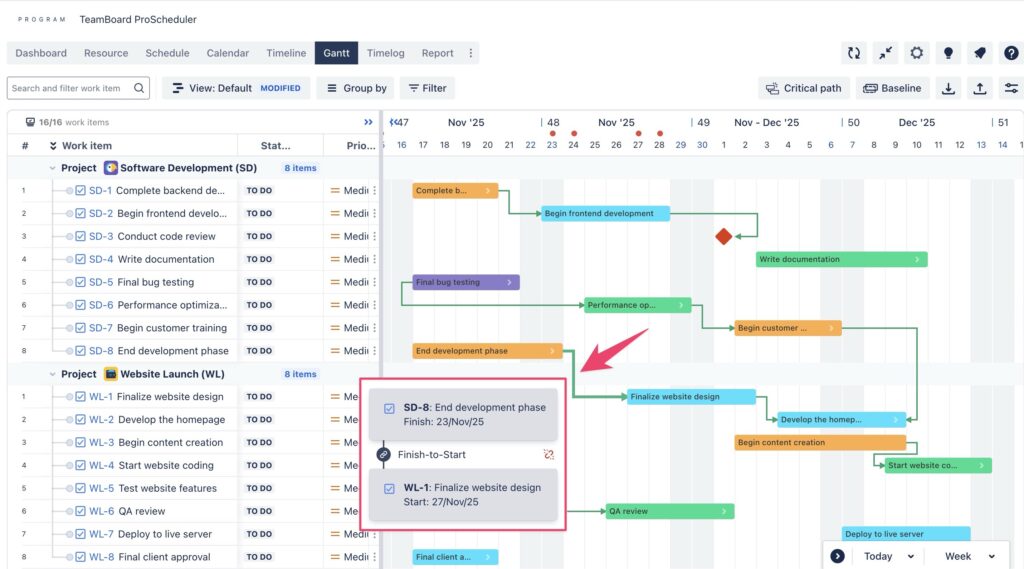
In the Gantt chart view, simply click on the start or end dot of one task from a project and drag it to the start or end dot of a task from another project. This action will automatically create a dependency link between the two tasks, defining the type of relationship
Once the dependency is created, you can easily see how tasks across different projects are connected. The Gantt chart will visually represent this connection with an arrow, and you can adjust the timeline for one task, automatically updating the dependent task based on the established dependency.
Step 5: Auto-Scheduling in Programs
As project tasks evolve, it’s important that dependent tasks automatically adjust to stay in sync. Without auto-scheduling, project managers would have to manually adjust each dependent task, leading to errors and delays.
Auto-scheduling ensures that when one task changes, all dependent tasks are updated automatically, saving time and reducing the risk of errors. This helps maintain alignment across multiple projects without constant manual intervention.
How to do:
-
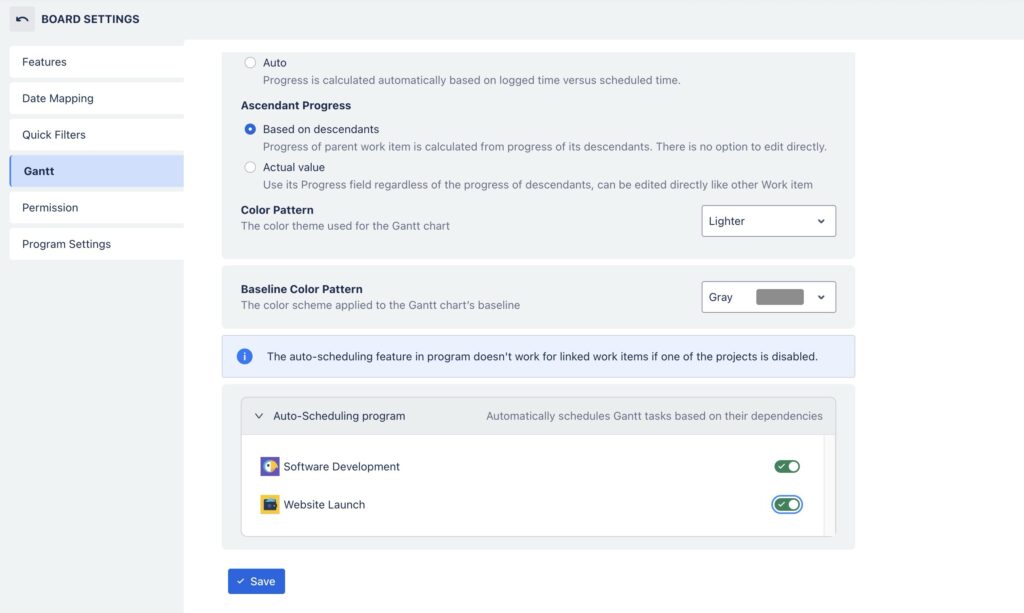
Enable Auto-Scheduling: In your program settings, enable the auto-scheduling feature. This will ensure that all dependent tasks across projects are automatically adjusted when a change is made to one task’s timeline.
-
Watch Tasks Sync: After adjusting the schedule of one task, ProScheduler will automatically adjust all linked tasks to maintain the proper sequence.
Step 6: Managing Dependency Loops
Dependency loops (or circular dependencies) can occur when two tasks are dependent on each other, creating a scheduling deadlock. This can result in infinite rescheduling, causing major project delays. ProScheduler automatically detects and highlights circular dependencies in red, helping you quickly identify and fix scheduling conflicts before they disrupt the project.
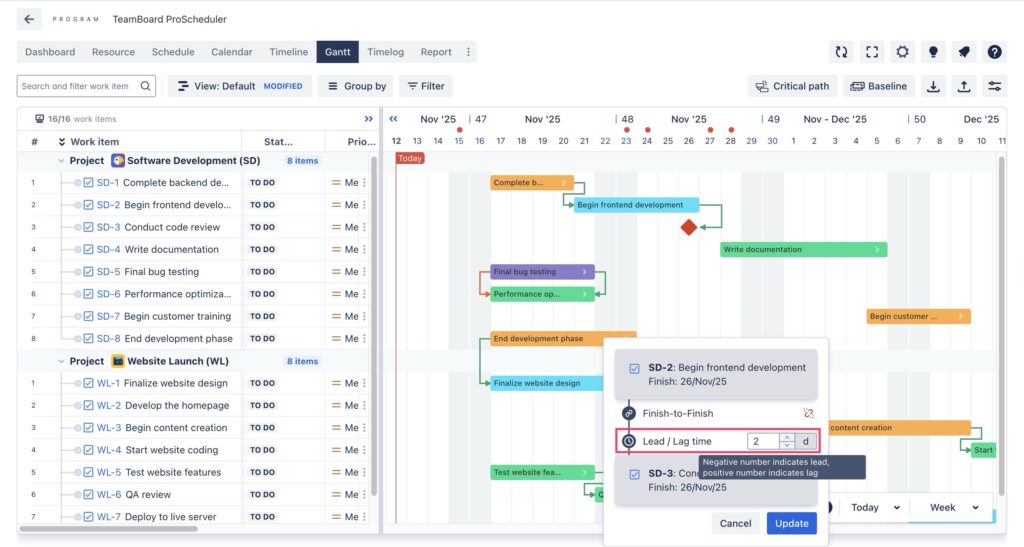
Step 7: Adjust Task Schedules with Lead and Lag Time
When projects experience delays or can be accelerated, adjusting the lead or lag time between tasks allows project managers to stay flexible and responsive. Lead and lag time are critical for accommodating unforeseen delays or capitalizing on opportunities to overlap tasks.
How to do:
- Click on the dependency link connecting two tasks.
- Locate the Lead/Lag field:
-
Adjust Lead Time: For tasks that can start before the predecessor finishes, simply input a negative number (e.g., -2 days) in the Lead/Lag field to make the dependent task start earlier.
-
Adjust Lag Time: For tasks that need to wait after a predecessor finishes, input a positive number (e.g., +3 days) to introduce a delay.
Conclusion
Effectively managing cross-project dependencies is essential for the success of any complex project. Without a clear view of how tasks across different projects are interconnected, delays, miscommunications, and scheduling conflicts are bound to occur.
With ProScheduler, you can automate the scheduling process, visualize task relationships, and easily track how changes in one project affect others. This comprehensive approach helps streamline project management, ensuring that timelines stay on track, resources are efficiently allocated, and potential bottlenecks are quickly identified and resolved.